
The way to apply polymeric sand is not a hard job by any means. But wait. Here is the caveat! You must have to do it right following some precautionary steps to avoid an unsuccessful installation.
What if you had done everything right, but all of a sudden, a heavy rainfall came and would have made you do everything again? What a pity! Don’t be troubled
Here I’m going to give you the full guide on how to use polymeric sand, keeping every precaution into consideration, and doing everything correctly.
Here is the list of points you need to consider for applying polymeric sand –
- Checking the weather.
- Picking the right polymeric sand.
- Getting the tools ready.
- Pouring the sand.
- Using the push broom, plate compactor, leaf blower.
- Activating the polymeric sand.
- Letting it dry.
Without any further ado, let’s get to know every detail of the process.
How to Use Polymeric Sand – Everything You Need to Know
Check the Weather
First off, the obvious: check the weather. You must apply polymeric sand on a sunny day. More importantly, there should not be any chance of rain two days after you apply the sand. So, it’s essential to have a bright sunny day before and after applying polymeric sand to the pavers.
Why? It’s because if it rains before you apply the sand, the surface will be wet, and it will contain moisture. As a result, the sand will start working right after using it by creating a bond on the surface. In other words, it will stick to the surface, which will be so hard to remove.
On the other hand, if it rains profoundly right after the installation, it will bring the sand to the surface and damage it. That’s why you would have to apply the sand again. Therefore, it’s quite necessary to check the weather forecast before applying polymeric sand on the paver.
Don’t Go Cheap
Buying top-notch polymeric sand is crucial here. You will find multiple brands selling polymeric sand in different price ranges and qualities. Some companies tend to use low-quality polymers (e.g., Portland cement), sand and then offer cheap prices.
Don’t be fooled by buying those cheap sandbags. I know it?s quite overwhelming to choose the best bet. That’s why I’ve prepared the best polymeric sand guide for you.
If you go cheap, be sure you will have to spend more money pretty soon. It’s because the low-quality polymers or the cement will create a haze on the surface. You will have to spend both your time and money to get rid of it. On top of that, low-quality polymeric sands don’t last long.
Get Your Tools Ready
Now it’s time to apply a high-quality bag of sand on the dry surface. Get ready with the required tools. Here is the list of tools you need to arrange –
- A bag of polymeric sand (quantity varies based on the space).
- Utility knife.
- A push brooms.
- Plate compactor (35000 lbs of centrifugal force for an existing job, 4000-5000 lbs of centrifugal force for a new job)
- Leaf blower.
- Sprayer
- Hose
Get ready with those tools. You are going to need them to complete the following steps.
Pour the Sand
First, use the utility knife to open the sandbag. Without using the knife, you are very likely to get frustrated while opening the waterproof bag. Before pouring the sand, you must dry clean the surface to remove any debris or dust.
Now pour the sand. Remember, you shouldn’t over-pour the sand initially. Otherwise, it will be so difficult to remove the excess amount. However, you can always add new sand if you need to later. Here the idea is to fill the paver joints and cracks with polymeric sand. You are not doing sand bedding here.
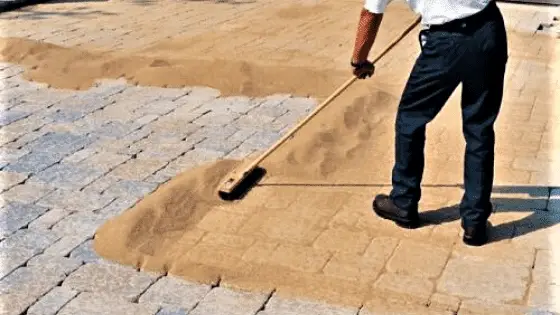
The Push Broom in Action
Now, you have to fill the joint gaps appropriately to complete the installation successfully. Use your push broom to sweep the sand efficiently. Go and move the push broom back and forth to fill the joint gap. The idea is to fill up all the paver cracks and joints appropriately. If you need to pour more sand, do it.
The Plate Compactor in Action
Don’t even think to avoid this step. It’s crucial to fill up the air pockets using a plate compactor. Some homeowners try to save their time and money by avoiding this step. That, in turn, results in breaking and cracking over time. Get a high-quality plate compactor and run it over the paver surface.
It will eventually put the sand down and fill up any air pockets. This will make the joints fully packed with polymeric sand. Do this step twice. Once the sand gets tightly compact into the joint, it will last long for sure.
Use the Leaf Blower
Don’t rush to activate the sand. Before you start using the sprayer for activating the polymeric sand, you must consider blowing off the residue and dust. It’s because, if you don’t blow off the residue, it will harden on the surface after activating.
You have to set the blower to the lowest speed and don’t face it straight to the surface. Make sure to angle the leaf blower so that the sand doesn’t come out from the joint or crack.
Activate the Sand Using the Sprayer
Now, you’ve well prepared the surface for activating the polymeric sand. It’s time to use the sprayer by keeping the nozzle in light pressure. Following the manufacturer, instruction is vital here. You should spray from a certain height too. You should not spray too much water too quickly nor too little water.
Let the Joints Dry
You are all done. Now let the joint dry for at least two complete days. Then check if you need to put more sand or not to fill up any crack.
Final Words
Applying polymeric sand vs regular sand on paver is not the same. I believe you are now quite clear about how to use polymeric sand efficiently without worrying about mistakes. Don’t miss out on the precautionary tips I’ve mentioned in this article. It will save you money, time, and reputation. You don’t have to hire any professional to do this job. It’s a pretty simple task for any DIYer.